How to Migrate Your File Server to Azure Files
With the cloud being the next best thing in the technology world, it only makes sense to think about how to leverage that with your files. Azure Files helps you take your files/directories and put them into the cloud. With Azure Files, users will be able to access the files from anywhere, which makes it easier to share access and collaborate on the same files with ease. You will no longer have to worry about managing the hardware or any of the OS patches. It is more resilient than a local server because it can be provisioned with local (drive failure), zone (datacenter failure), and/or geo (region failure) redundancy.
Once you have determined if Azure Files is right for your organization, you need to plan out the migration. The first part of the migration plan should be to figure out which files you are going to migrate and where these files are coming from. File servers will be one location to consider when deciding what files will be migrated. Other options to consider are cloud storage like Exavault or Dropbox, NAS (Network Access Storage) devices, and backups – both offline and online. Once you have an idea of where all your files are, you need to decide if you want to consolidate all of your files and move to a cloud-only model or if you wish to set up a hybrid environment. Azure File Sync allows you to gain many of the benefits of Azure Files while still maintaining your file server. With Azure File Sync, your Azure Files store becomes the single point of truth. After Azure File Sync is set up, the file sync agent will periodically check your on-prem server to make sure that Azure Files is up to date with the latest files. One of the reasons our clients prefer to use Azure File Sync is to maintain a physical copy of their data. After you have a plan on what is going to be migrated, it is time to start thinking about lifecycle management.
With Azure Files, you can set file lifecycle management policies. There are two lifecycle access tiers available to Azure Files – hot and cool. By default, all files are considered hot when first migrated into Azure. You will need to determine how long you wish a file to be in the hot access tier before it transitions to the cool access tier. The major benefit of having a lifecycle management policy is cost savings. Hot access has a lower access cost, but a higher storage cost than cool access. Whereas cool access has a higher access cost and a lower storage cost. The access cost comes from how often you plan on accessing your files, hot access is used for files that will be accessed frequently and cool access is for files that will be accessed infrequently. After planning if you are going to implement a lifecycle management policy, the next step is to set up an Azure Storage Account.
Azure Storage Accounts are where you provision Azure File shares, but they can also be used to provision blob, table, and queue storage in Azure as well. The storage account provides a URL that makes your data accessible over HTTP(S) from all over the world. There are multiple types of Azure Storage Accounts, but for the purpose of this guide, we will be looking to use a standard general-purpose v2 storage account. There are multiple tiers of redundancy available for this type of storage account, including locally redundant storage (LRS), geo-redundant storage (GRS), and read-access geo-redundant storage (RA-GRS). You will need to determine which level of redundancy is needed for your files. After creating the Azure Storage Account, it is time to start thinking about how the files are going to be migrated to your Azure Files share.
There are multiple methods to choose from for migrating your files into Azure Files. One option you can use is PowerShell with the help of AzCopy. AzCopy is a utility that gives you the ability to migrate your files using PowerShell. To use AzCopy you will need to download the utility and install it on the computer/server that contains the files you wish to migrate. Since AzCopy is going to rely heavily on network bandwidth, I would recommend using a computer that has access to good Internet speeds. The option to use Azure Active Directory to authorize access to the storage account is only available for Azure Blob Storage. For this reason, you will need to use a SAS (Stored Access Signature) token to authenticate. A SAS token is used to grant access to resources inside your Azure Storage Account. SAS tokens give you granular control over what resources people have access to, what permissions people have with your resources, and how long the token is valid. To generate a SAS token, navigate to your Azure portal and go to your Azure Storage Account. In your Azure Storage Account, under the ‘Security + networking’ blade, click on ‘Shared access signature’. In this menu, you will fill out the required information and how long you wish for the token to be valid. You will want to check the File box under ’Allowed services’ and check the Container box under ‘Allowed resource types’. Once you are finished filling out the information, click the ’Generate SAS and connection string’ button.
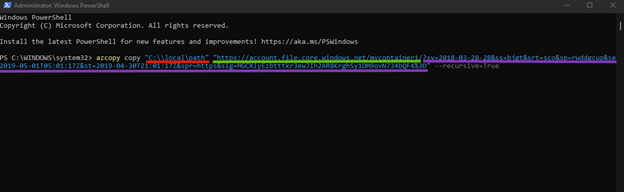
The text underlined in red is the source folder (the folder containing the files that are going to be migrated). The text underlined in green is the destination URL of your Azure Files tenant. And the text underlined in purple is the SAS Token. This is a good option for someone who is comfortable running scripts. The downside of AzCopy is that there is no good way to deal with errors. You can add the following code to your script:
jobs show <job-id> --with-status=FailedThis will give you a list of files that failed to migrate, which can be useful to see which specific files that errored out.
Another option to migrate files is a tool called Azure Storage Explorer. This works and looks similar to Windows File Explorer with the exception being that it is connected to and displaying your Azure account’s storage resources and not to your local HDD/SSD. You will need to download and install the software to be able to use it. The download for Azure Storage Explorer can be found here. You can click on the Azure File container you wish to add your files to and click the Upload button. After you add them to Azure Storage Explorer, it will push your files up into the cloud. This is a good option if you are going to be consistently moving files back and forth between on-premises and the cloud. This is also an option to access your files whenever you need to. You need to keep in mind hot tier and cool tier access have different access costs associated with them. So even though, you can see and access cool tier files from Azure Storage Explorer, it is best to use it for accessing hot tier files.
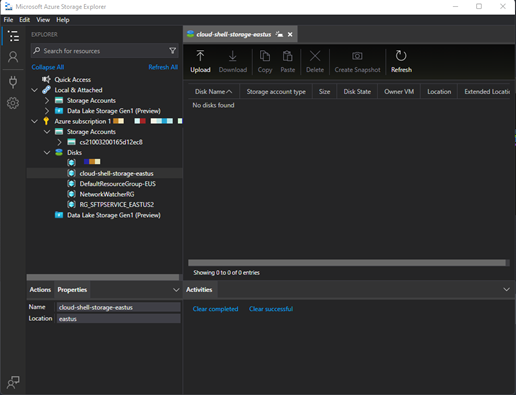
Azure Storage Explorer also requires a good Internet connection to work properly. One thing to consider is you will have to add a SAS token to authenticate to Azure Files and set how many days that SAS token is good for. Once set, there is no additional login needed, so if your device is lost or stolen then your Azure Files account will be open for others to see.
Lastly, Azure Import/Export service is used to securely import or export large amounts of data to/from Azure Files. To use this service, you would upload all of your files to a physical disk drive using the WAImportExport tool. After that is complete, you will need to go to your Azure Storage Account and create an import job, provide a return address, and provide a carrier account number. Next, you will ship the disks to Microsoft using the address Microsoft provides, once complete add the shipping tracking number to your import job in the Azure portal. Once the technicians at Microsoft have migrated your files into your Azure Files share, they will ship the disks back to you using the return address you provided. Alternatively, if you do not wish to use your own disks, you can use Azure Data Box Disk service and Microsoft will ship you SSDs to upload your files to and then ship back to Microsoft. After Microsoft receives the disk drive, their technicians would upload the data into your Azure File container. Azure Import/Export and Data Box Disk service are good options if you have large amounts of data to migrate or if you have a slow internet connection. The downsides of this option are the time it takes to upload your files, the cost, and it is not offered in every region. This option is going to take more time to migrate your files since you have to ship the disks to Microsoft before uploading your files. The cost of an Azure Import/Export service is $80 per storage disk plus shipping. The cost of Azure Data Box Disk service (for one physical storage disk) is $50 for the disk, $10 per disk per day (this does not include the time it takes for the disk to get to you), and $35 for shipping (this is shipping for there and back). That brings the total to $95, this is assuming you only have the disk for one day. Once your files have successfully been migrated and you are using Azure Files, you have now taken another step towards using the cloud to its full potential, including cost savings.
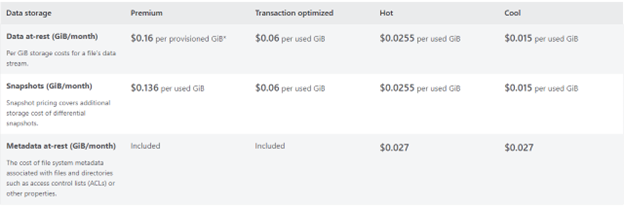
The overall cost of Azure Files is lower when you consider the fact you would no longer have to pay for hardware maintenance to store your files or pay for someone to maintain your files for you. Below is a rough price scheme on the cost of Azure Files for the Premium, Transaction-optimized, hot, and cool tiers. As you can see there can be significant cost advantages to using something like Azure Files when you factor in things like maintenance, operation and troubleshooting/outages, as well as hardware costs.
Congratulations – you have migrated your organization’s file server into the cloud! This migration will save your organization money on cloud storage, maintenance, and hardware costs. Furthermore, it will give your users the option to work from anywhere while still being able to easily access and collaborate on their files with ease. You can also consider leveraging Azure File Sync if you wish to retain a physical copy of your data (and gain lightning-fast local network access speeds at your site!). Azure Files is just one of the ways you can migrate your IT infrastructure into the cloud using Azure – see our other blog posts to learn about other ways.
If you want to sit down and discuss your organization’s specific situation and needs to hear what a cloud migration might look like – contact us today to set up a meeting where we will help you understand all the implications of a project like this.